You'll probably agree that as a society we're too quick to throw things away and buy new all the time. We've teamed up with the ever so talented Cassie Fairy who loves to spend her time reusing, recycling and repurposing clothing and household items. She's probably one of the thriftiest people you will come across.
We tasked her with sourcing an item that you could possibly find in a self storage unit and upcycle it into something useful and here is what she came up with!
Upcycled Lego Storage Unit
When you’ve got little ones in the house, it can be difficult to keep all their toys in order. And we can all recall how painful it is to unexpectedly step on a Lego brick, can’t we? But, if you’ve got an old shelving unit hanging around, it’s easy to create a fun play-centre that incorporates some handy storage too.
.jpg.aspx)
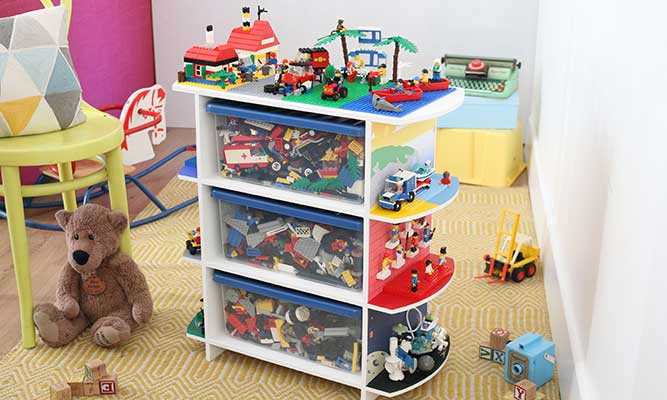
Just a lick of paint and a bit of glue is all it takes to turn something drab – like this old MDF skirted display table – into an exciting piece of furniture for the kids’ bedroom or playroom. Decorated shelves provide space for children to play games and display their makes. And, hopefully, it’ll help them to keep their toys organised too!
You can even get youngsters involved in this project by using their own craft supplies, poster paint and PVA glue to decorate the shelves. Just keep them away from the hot glue! This kind of cabinet can be used to display favourite toys, or you can add a variety of compatible bases for Lego, Playmobil, Duplo and more.
You will need:
- Old shelving or storage unit
- Sand paper
- Chalk paint
- Acrylic paint
- PVA glue
- Colour printer and paper or poster backgrounds
- Hot glue gun and glue sticks
- Compatible play bases
- Toy bricks
- Storage boxes
Step 1

If the unit has any rough edges, be sure to
sand them smooth before painting to make it safe for children. Other than smoothing the edges, you shouldn’t need to prepare the surface before painting, as chalk paint adheres well to most surfaces. Give the unit a coat of chalk paint and allow to dry thoroughly. You may need to add a second coat of paint to get a fresh, white finish.
Step 2

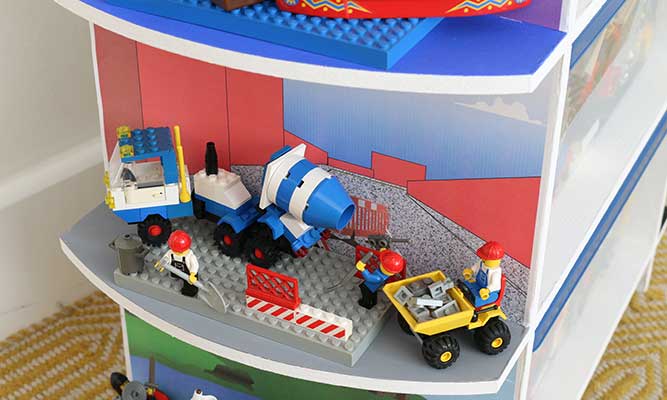
Use acrylic or poster paint to add colour to the shelves in the areas that will become display zones. On this unit, we’ve painted the external shelves, but if your cabinet has a different design, such as wide internal shelves or cube-shaped shelves, choose a few spaces to decorate with colour. You can mask off the edges to keep it neat – which is a good idea if the little ones are helping to paint! Allow the paint to dry completely.
Step 3

Print out some background scenes for the backs of the shelves. You
could use photos you’ve taken of landscapes and seascapes or make up a colourful background using a desktop publishing programme. Alternatively, you could use posters or pages from the toy catalogue.


Coat the back of the shelf with a thin layer of PVA glue and stick the image in place. If you’re decorating internal shelves, you can stick more backgrounds on the sides too. Alternatively, you can print directly onto sticky-backed paper, peel off the backing and stick the image to the back of the shelves, no glue needed!
Step 4
Use a hot glue gun (adults only!) to stick base plates in matching colours to the shelves. If you’d like to be able to remove the base plates in the future, you could attach the ‘loop’ side of sticky-backed Velcro to the underside of the base plate and stick the corresponding ‘hook’ piece of Velcro to the shelf.
A great way to store characters is to
hot-glue single bricks to the back of the shelf so that characters can stand on the bricks. This allows characters to be proudly displayed and makes it easy for kids to find their favourites.

Step 5
.jpg.aspx)
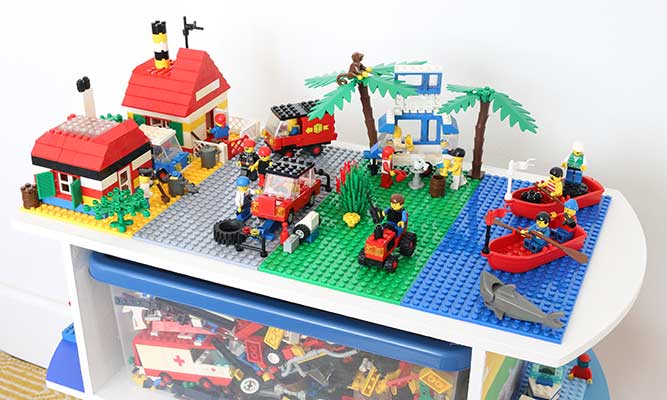
Attach some larger base plates to the top of the unit to create a large playing area. We’ve used compatible bases in a variety of colours to provide space for roads, houses, gardens and water. Again, you can hot glue these into place, or use self-adhesive Velcro so that you can change the colour or size of the base plates as needed.

Step 6

Finally, add some
storage boxes to hold all the toys, bricks and instructions. Measure the space you have available on the shelves and try to find some boxes that’ll fit neatly inside the gaps. The children will always be able to find their toys in the storage boxes – and will have no excuse not to tidy them away at the end of playtime!

We hope this project has given you some ideas for giving your old cabinets or shelves a makeover. If you’ve got an ugly MDF unit stashed away in storage or are thinking of investing in some small flat-packed shelves for the kids’ room, why not keep this easy DIY idea in mind. And don’t forget to get the little ones to help too!
Thank you so much Cassie it's truly amazing, being both practical and beautiful.
If you've been inspired to create your own upcycled Lego storage unit we'd love to see the results!
*****
Discover more upcycling articles on Safestore’s blog where you may find inspiration. Or, if you’re looking to store some items which you may want to upcycle in future we have a range of self storage options in nearly 120 locations – find your nearest store for a quote today.